Showing posts with label makeover. Show all posts

Friday, June 19, 2015

Balance


It has been quiet on the blog lately.  Life is so full these days.  Which is awesome and great and wonderful.  And exhausting.  Like all parents out there, I find it hard to find perfect balance in my life.  A perfect balance that allows me to be efficient and effective at work, present at home and fulfilling to myself.  I am not perfect so at any given time, something usually suffers.  Lately, it has been the blogging.  Although, I have been quite busy on projects, makeovers and crafts.  I just have not shared them because I could not put the perfect words to the perfect pictures with the perfect lighting (or as perfect as I am capable of with my limited photography skills).

You see, I have this problem with perfection.  Sometimes it is crippling.  If I can't do it perfectly, why do it?  I don't want to put a product out there that was not put out there with my best efforts.  This problem with perfection has been with me ever since I was little.  If I could not be one of the best players on the team, why play (basketball, softball)?  It can make your life really small.  Until you are living in a tiny box, terrified of not being perfect.

I am old enough and know myself well enough now to see it for what it is.  After about 2 weeks, I realized where I was heading.  Instead of being disappointed I had to go back on my medication, I was relieved I had a solution.  Grateful to have something to pull me back to where I want to be.

So lets not waste anymore time and let me show you what I have been up to....

Here is a before pic of my dining room.  Lots of room for parties:)  We used it a lot when entertaining but not at all when not entertaining.  I wanted this to be a more useable space.  I mean, its huge and it was just sitting idle most of the time.  And my craft/sewing/toy/guest room was busting at the seams.  So I thought, why not move all my craft supplies to the dining room and get a nice, big table to craft (and dine) at?  And that was the purpose behind the change.


Also, I wanted to purge the laminate book shelves that I painted black 10 years ago.  It was time!  And I wanted to change up my gallery wall.


This the best before pic of where my fireplace was that was taken within the past 6 months.  Oops.


After selling my table, chairs and bar stools, I moved the fireplace to the area where the dining table was.  Between the patio door and window.  Immediately, the room felt different.  More cozy and it made sense.  I should have had it there all along!  Gah!

To fill the empty wall this move left behind, I searched thrift stores for a small dresser or cabinet and I was fortunate enough to find this guy.


I sanded it down (I LOATHE sanding).  Then I took a 50/50 mixture of white latex paint and water and painted sections then rubbed it off.  Like I was staining.  I put the knobs back on and it turned out PERFECT!  Double bonus, it is on wheels!


Now it houses all the craft supplies I could possibly cram into it (decorative paper, felt, scissors, writing utensils, cards, laminator, chalk, glue, stapler, ribbons, etc).  Next to it, I hauled up a wicker chair from my basement for some additional seating which can also be pulled up to the new table.

Speaking of the new table, I wanted to go with a big farmhouse, chunky table.  My parents came and I put my dad to work immediately building me one.  

Look at him!  What a guy!

Once done, we brought it in and placed it right in the middle of the room.  I bought a nice sisal rug off of Rugs USA (they had a 70% off sale + free shipping) to anchor the table.  (I got a good teasing about having 8 rugs on this floor of our house from the hubs.  He hates rugs.  I love them.  I win.)

See what I mean about the new fireplace placement?  Its perfect!

But the table was not done!  I stained it with a mix of Minwax Weathered Grey (75%) and Minwax Dark Walnut (25%).  It looked really pretty but it was not quite the style I was going for.  Too dark and competed with other elements in the room.  So I white washed if like I did the new cabinet.  

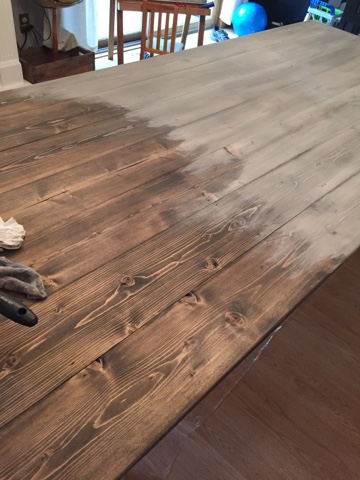
Pic during the white washing process.

The top white washed.

Then I sealed it with 3 coats of clear Polycrylic.


I painted the skirting and legs white and the table was done.  

Pay no attention to that back wall.  Still working on the details there.

I bought two of these mid century modern style chairs off Overstock for the ends of the table.  I am still working on what to do for the rest of the chairs.  I will figure it out but have a few options I am considering (lucite, wood, benches).

I embellished the chandelier with some wooden beads I strung on fishing line.  I have more and plan on adding to it at some point.  


It is certainly coming together.  From here you can get a glimpse of the new gallery wall.  


I wanted to get Syd's silhouette up and I wanted to extend the gallery wall to wrap around the corner. Everything else was worked in going away from that point.


The furniture in this area was also rearranged.  Feels good to change things up.  They had been the same for SOOOOOO long.


I mean, come on....


I am thinking it is time for the blinds to go.  They seem too reddish now.


And there you have it.  Still a work in progress.  But it is coming along nicely.  What do you think?  Suggestions for side chairs or benches?

Thursday, August 28, 2014

Entryway Bench

Remember this blah entryway?


 That turned into this fantastic entryway?


But then I realized I needed a new bench because I simply could not deal with the one I had so I drafted up a sketch of one for my dad to make me the bench that I had to have for the space?


And then my mom would send me teaser texts like this one?


Well, I finally got it.  And it is perfect!!!!


 The pillow is actually a placemat!  I wish I was the genius behind that idea but I am not.  Got the idea from this blog.

 Those little cowboy boots were Sully's gift for starring standing up in his uncle's wedding in Nashville in May.


Here is the hidden corner I have never showed you.  The wall above the board and batten is still a work in progress and the organization is not optimized yet.


And one last pic...

Can't wait to haul it outside for some fall sibling pics this fall;)

Linked up to Thrifty Decor Chick Decor Chick Link up party.

Saturday, August 23, 2014

Bathroom reveal

Well, after our old dinosaur laptop was unable to obtain a wireless signal anymore and we were forced to get a new laptop, I was able to figure out how to download pics to this new laptop and can finally share my upstairs bathroom makeover.

Here is the the before:


BOOOOORRRRRRIIIIIIGGGGG.

Then came the new wall color, painting the vanity, new shower rod and shower curtain, new vanity light and a DIY towel hook.  Which got us to this...


Which already made a huge difference.  But my vision was for much more of a change.  And it was accomplished by adding a barn wood frame around the mirror and some barn wood shelves over the toilet (thanks Dad!!).


 Lantern I got from a Swappers Meet while in MN recently.

 Wash clothes at the ready for cleaning baby and toddler bodies.

 Q-tip container was another MN buy recently.

Close-up of the new light fixture (that I installed myself).

 And there you have it.  The bathroom has a totally different look and feel for minimal investment.  Are there still things I want to change?  Of course (linoleum floor).  But I think it would be a waste of money since I have plans/visions for a complete bathroom remodel several years down the road.  This is perfect and looks even better in reality than it did in my head.  I am eager to change up the shelf decor with the seasons.

From this...


To this....


I still have one last decor item to add but I will get to that later.  Stay tuned.

Monday, August 4, 2014

Upstairs bathroom update

Our upstairs bathroom has been the armpit of our house for years.  It is neglected and forgotten about.  Truthfully, it is embarrassing.  I painted this room the first year we moved into our house.  I chose what I thought was a nice neutral color only to get it on the walls and have the hubs ask, "why did you paint the bathroom flesh color??"  I thought he was ridiculous.... but he was right.  It was all wrong.  Over the years, I did change out the shower curtain and add some art but it was no use.  It was not working.

Nevermind the paint lid and screwdriver on the counter.  I had already removed the art, towel racks and started prepping for paint before snapping these pics.  


Since we can't remake the bathroom into a larger, more spacious bathroom right now, I at least could update the place better.  (Ideally, I would like to knock out the wall behind the shower since that is our walk-in closet, and extend the bathroom back several feet, put in a double sink vanity and put in hexagon floor tiles.  Yeah, apparently I have nothing better to do but dream about house updates.)

I painted the room a greige (grey/beige).  Any you already saw the hook rack I made here.

New shower curtain and curtain rod.


New light fixture which I installed myself!!

 Sorry the pic of the light is hard to see.  I have never seen the bathroom so bright in the last 9 years we lived here!  Holy light, Batman!!! I will get a better pic of that soon.

But more exciting, the vanity got a new look with some paint and hardware.

Paint: Behr paint and primer in one, blueberry twist in semi-gloss.

Love it!!  More to come...